7.24.2013

Anna's Not a Little Girl Anymore

Anyone needing proof of that can check out her brand new room. Technically, it's the same room. It's just been updated. Gone are the bubble gum pink walls and the loft bed perfect for a little girl. Now we have bright turquoise walls with hot pink accents, plenty of storage, and space for our growing girl to create. Here's how it happened.

Back in January, Anna and I began talking about redoing her room, taking it from "little girl space" to "teenager zone". She was on board, and ready to make some changes. So we scoured Pinterest for ideas, drew up some plans, and then waited. And waited. And waited. It was June before we could get started on this project, mainly because we had so many other irons in the fire.

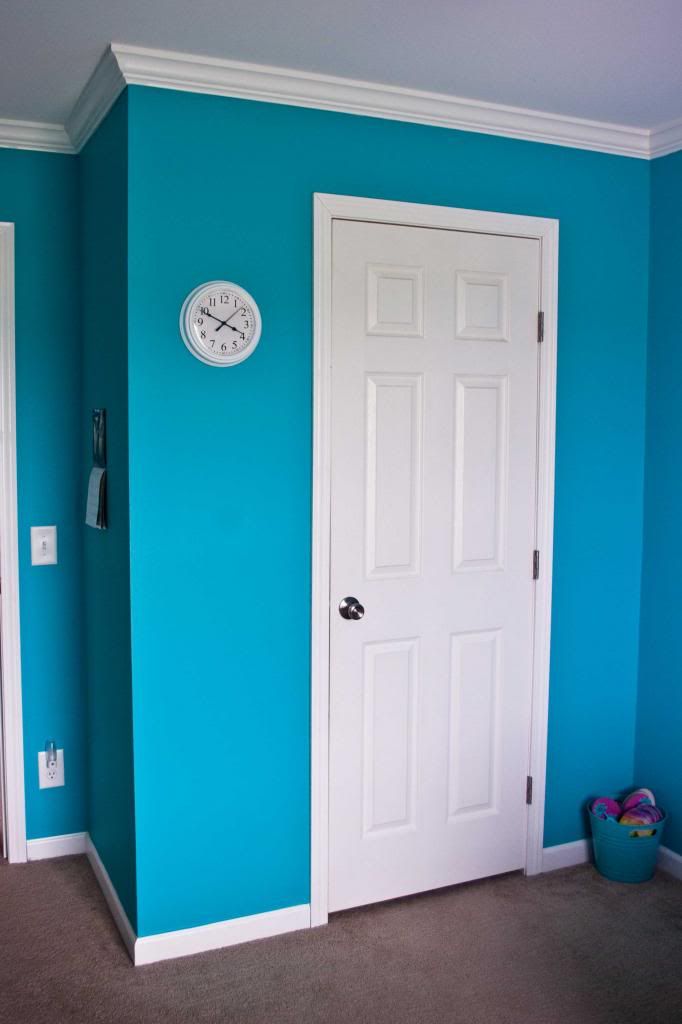
First order of business was to choose a paint color and paint. Anna went with this deep turquoise called Rushing Stream from Valspar. We chose the Valspar HD paint, which went on in one coat and is super rich and vibrant. And with that white trim, it just pops!


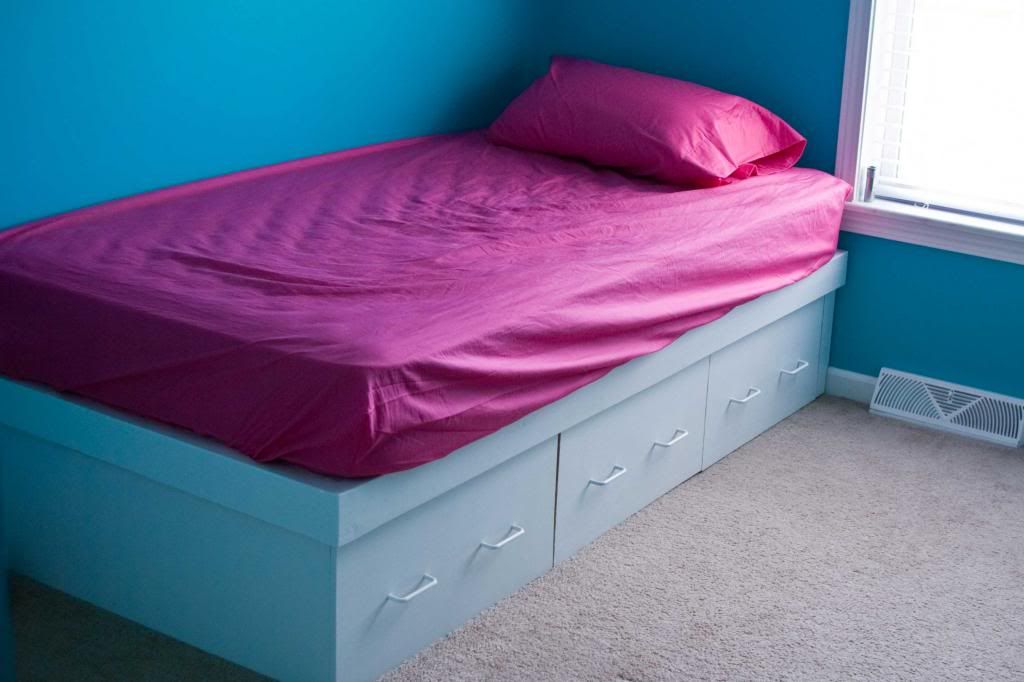
After paint came construction. We knew we had two major pieces to construct in this room: a bed with tons of built-in storage for books, and a desk so she has a space to be creative. First up was the bed, and after much discussion and brainstorming Jas dreamed up this perfect bed. It utilizes the platform from her loft bed, but underneath are now three full-depth drawers on casters that she can roll out to get to all her books. You wouldn't believe the amount of storage in those drawers! He added a face-frame all the way around so that the whole piece looks custom and built-in, which looks amazing! Anna wanted hot pink accents, so we found sheets in the perfect shade at Walmart. We also picked up a blackout curtain in the same hot pink. 


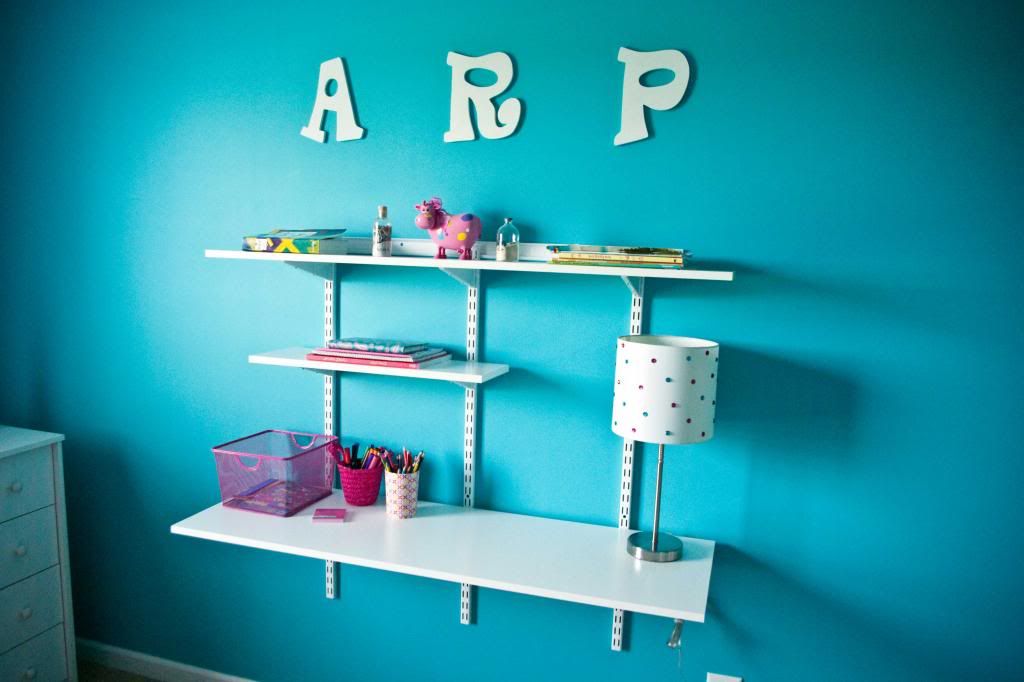
The desk was next to build, and after once again doing plenty of inspiration research on Pinterest, we went with a desk made from modular shelving attached to the wall. It adds all the space she needs, but in a much smaller footprint. And, with no bulky legs and nothing sitting on the floor, it makes the room feel larger. 


Anna wanted all her clothes in the closet, so the dresser is now being used to house all her art supplies. Three shoebox-size containers fit side-by-side in each drawer, so all her arts and crafts materials are easily accessible from the desk.

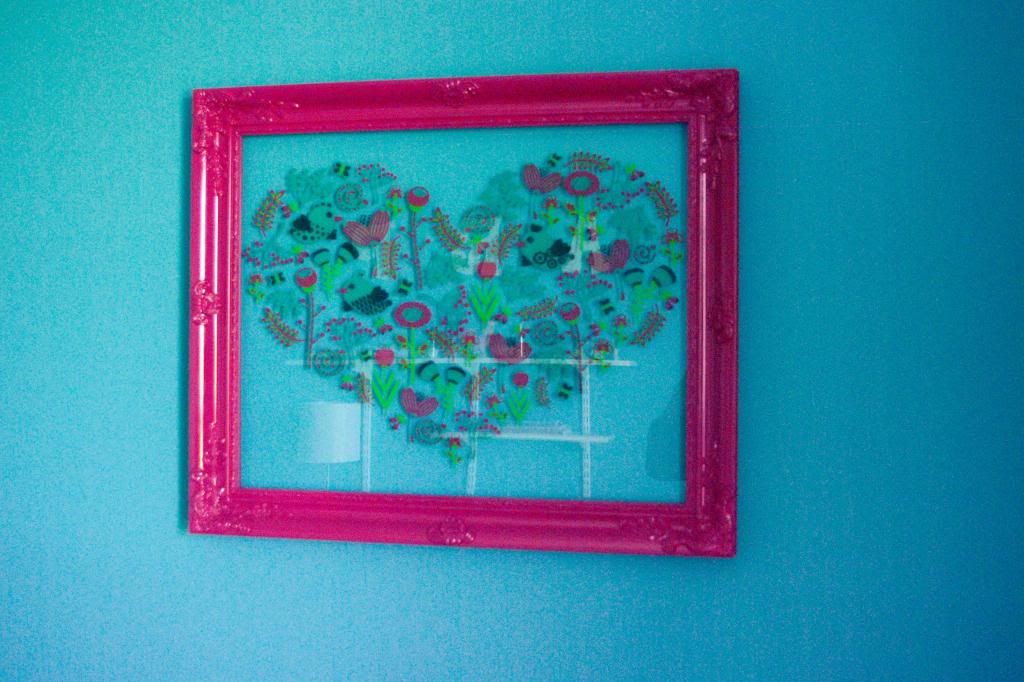
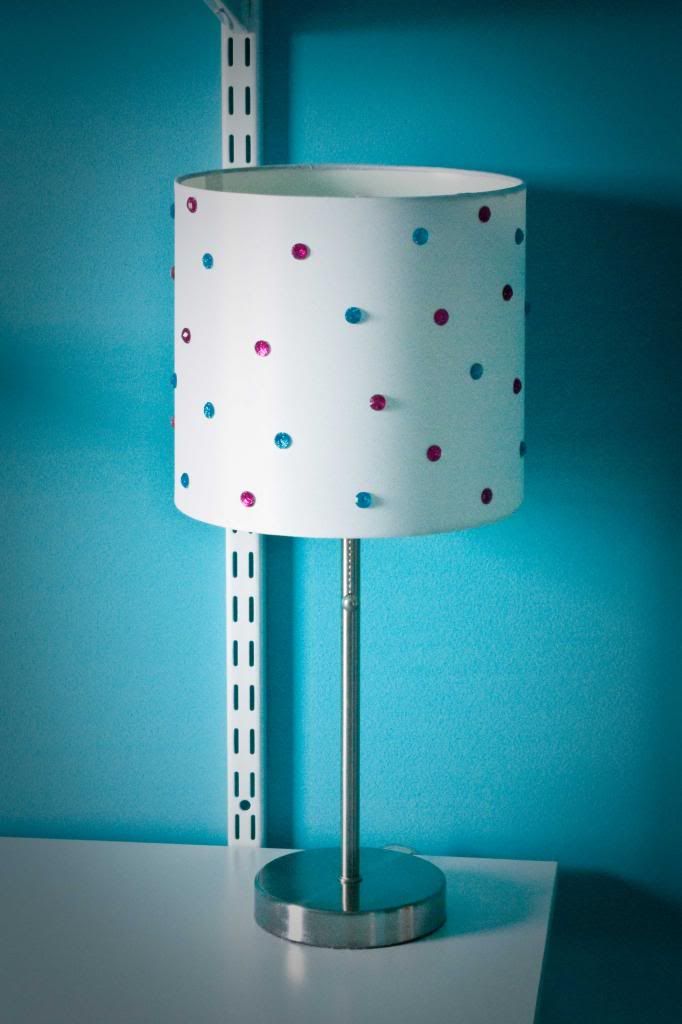
The last part was adding finishing touches. I found some hot pink desk accessories at Target and Hobby Lobby. The pink cow was already on hand, as were the various turquoise and pink journals. We reused one of the lamps from our room, and I added turquoise and hot pink glitter jewels to the shade to make it really stand out. Mom found a beautiful and oh-so-unique piece of art to hang above the bed. Little by little it has come together over the course of the month.


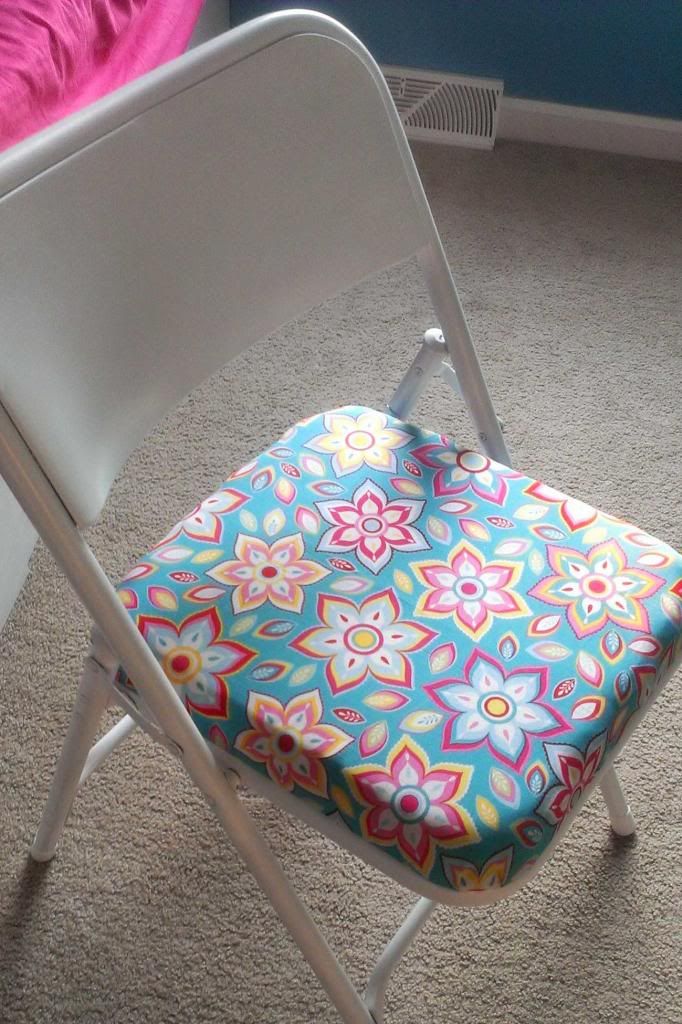
The last big piece to finish was the desk chair. I asked people to be on the lookout for a metal folding chair for as cheap as possible. The condition didn't matter, as long as it still folded and no legs were broken. Dad came through almost immediately, finding an old Samsonite chair for free in Chaffee. Jas had to rebuild the seat, because it had water damage. I sanded like crazy, and then we painted it glossy white. We added a new foam cushion (courtesy of the old padded headboard) plus some adorable fabric Anna found at Hobby Lobby. It turned out super cute!


All that's left is to add some small decorative frames for pictures on the dresser, and either a fabric-covered bulletin board or pillow made with the chair fabric. Then we can call this project finished! (And start on Connor's room!) :)

6.27.2013

A New Headboard

That title really isn't very exciting, but my brain is tired and I couldn't come up with anything catchy. :) Jas built me a new headboard for our bed, not because there was anything wrong with the old one, but I had just  grown tired of it. When we first moved into this house, the newly built bed had no headboard. We eventually settled on a padded one, drew up some plans, built it, and then covered it with a chocolate brown fabric to match the nightstands. It was simple and functional, but not very pretty.

Fast forward a couple of years, and my mind has been percolating with possible headboards for months. Thanks to Pinterest, I found plenty of inspiration, but nothing that was perfect. So as usual, I shared what I would like with my wonderful husband, he took me to Menard's to research outside-the-box options to create my vision, we settled on a plan, and then he built it. It's our proven method for creating things for our home, and I love the way it plays out.

For this particular project, I knew I wanted a more "rustic" look, but not too over-the-top. I liked the look of several wooden headboards I'd seen via the interwebs. Like this one, for example . . .


But I also liked the idea of lights attached to the headboard itself, instead of lamps on nightstands. Sort of like this one . . . 


Jas was on board with my vision, so we made a trip to Menard's to do some research. We looked at several possible options, including cedar tongue-and-groove siding and decorative wood panels, but in the end we decided on beadboard in an unfinished whitewood. The knots give it so much more depth and character, and that's what makes it beautiful. We chose to stain it a dark walnut to blend with the existing dark wood furniture in the room. Plus, the walnut stain was leftover from our coffee table and end table we built for the basement family room. 

The biggest decision to make was really the choice of light fixtures. After much back-and-forth, I decided on these oil rubbed bronze wall lights from Menards, with a gorgeous alabaster glass shade. We mounted them upside down, and the great thing about them is that they rotate, so if you want to read in bed you can position them accordingly. They really finish it off nicely!

Jas used the existing structure from the first headboard, but removed the padding and fabric cover. We attached the beadboard (which is tongue-and-groove) to the face, then finished it out with some pine moulding trim. After a couple of coats of polyurethane stain, we attached the lights and hauled the whole thing back upstairs. It looks beautiful!


5.06.2013

New Laundry Lights

Once upon a time, I saw an adorable clothespin chandelier that Sherry Petersik (from Young House Love) created for her self-imposed Pinterest challenge. And I knew that I wanted to create something similar for our laundry room. Fast forward to today, when we finally got around to completing it. And it was so simple that I wish we'd jumped on it earlier.


In all fairness, I couldn't create a chandelier, because we have two lights in our laundry room (one in the middle of the room and one above the laundry sink). So, Jas and I brainstormed and came up with these slightly-smaller-in-diameter drum shades. And they look amazing!


And the best part was that most of what we used we already had on hand (I love when that happens!). We used the existing light bases, but changed them from two bulbs to one. We also used CFL bulbs to minimize heat. (The bulb sits pretty far from the clothespins, but still . . . ) Making the shades was super simple. We took a roll of hardware cloth (1" openings) and formed it into a cylindrical shape that would fit flush with the interior of our light base. Jason used the open ends of the cut wire to twist around the other side, making a fairly seamless cylinder. He came up with an ingenious method for attaching the cylinder to the light base. He drilled four small holes in the base, and then we used wire leftover from our drop ceiling installation in the basement to attach the hardware cloth to the light base. 

Attaching the clothespins was the easy part. Sherry Petersik had already demonstrated on her blog the different ways to attach them, and I'd already decided I liked this zigzag pattern best. It was easy peasy (Anna even helped  me do the second light!). 

These lights look fantastic in the daytime (I love the added texture to the room!), but they really shine at night. (No pun intended!) The light pattern reflected on the ceiling is really, really pretty.


Total cost for this project? Well, we already had the hardware cloth and wire. We reused the light bases, so the only things we bought were clothespins. There are 416 of them here (208 per light), so we ended up spending $9 for these two fabulous statement pieces. Love them!

4.14.2013

We have pendants!

This project qualifies as taking the longest amount of time to come to fruition. But in all fairness, 3/4 of that time has been spent trying to decide exactly what we wanted. Here's the breakdown:

1. When we drew up the plans for this house, there was not supposed to be a light above the kitchen island. We had asked our contractor to simply leave an open box above the island, so that we could add a fixture later. (We'd kind of settled on a modern halogen track system that we'd found at Buchheit's.) The only thing not right on the house when it was delivered was that they had added two lights above the island. (Considering that this is all we didn't like about the house, we didn't complain. This was small potatoes.)

2. The problem with the installed lights is that they were centered in the kitchen, not centered above the island. So just adding new light fixtures wasn't an option, because it would be even more noticeable that they weren't centered over the island. So we started brainstorming.

3. Three years later, we had put that project on the back burner while we tackled everything else you've read about here. But this fall we were discussing it again, and trying to come up with a plan. Jas was against pendants, because he thought they'd interrupt the flow and make it difficult to see from the living room to the kitchen (and vice versa). I really wanted pendants, but didn't want run-of-the-mill pendants. Also, the thought of climbing into the attic and moving the junction boxes, plus drywalling and painting over the existing holes after we added new ones did not seem appealing. So we looked at all our options. 

4. We finally settled on pendants, with two conditions. One, they had to be different (I definitely wanted to DIY them for a custom look.). Second, they couldn't be too low (disrupting the view from one room to another). 

5. Menard's had three pendant light kits on clearance over the winter, so we snagged those and began the long and arduous process of finding the perfect pendants. And when I say long and arduous, I'm not kidding. We spent over six months looking for exactly what we wanted. We were going to do Mason Jar lights, but it seems everybody's doing those (plus, the light they cast wouldn't really focus downward, which we wanted for the island -- we definitely wanted more "task" lighting). It seemed like every store we went to, we searched for odd items we could re-purpose as pendants (so they'd be one-of-a-kind).

6. Eventually, we discovered dark brown and green flower pots at Dollar General. $6 apiece. Hallelujah, the search was over! They were exactly the right size and shape, so we snapped them up and took them home.  

7. Next, Jas drilled holes in the bottom of the flower pots so the pendant light kit could go through. Then we had to paint them, which took several coats and lots and lots of sanding. We went with brushed nickel, so they'd match the rest of our fixtures.

8. The last step was building the box. Remember earlier how I mentioned that the lights were off-center and Jas didn't want to climb into the attic to redo the junction boxes, plus re-drywall the ceiling to cover the old holes? Yeah, he hadn't changed his mind on that. :) And I don't blame him. So we compromised with a shallow box that the pendants attach to, that is attached to the ceiling. The box had to be large enough to cover the old holes, and once we painted it white it fit right in. (The kids even got to help install it!)

I'm super happy with the way they turned out. And the light is just perfect! Jas painted the insides of the pendants white, so more light is reflected. And they're short enough that they don't block your view from one room to the other, yet they're substantial enough to fit with that massive island. Love, love, love them!


10.06.2012

The Basement is (Finally) Finished

After about three years being in this house, we finally got around to deciding what we really wanted to do with the basement. Right after we moved in we built the storage room, Jas' workshop, and the classroom. We used the main area for the kids' toys, then pared those down and turned it into a game room (complete with ping pong, air hockey, darts, and pop-a-shot). The classroom eventually turned into the computer room, because the kids (and me, if I'm honest) really preferred schooling upstairs with plenty of natural light. Then we got about $5600 worth of Interface by Flor carpet for the basement in May in St. Louis for $100. All we had to do was come pick it up! It looks amazing! The colors are very neutral - tan and blue and grey flecks, but the effect is fantastic (there's even a subtle leaf pattern embedded). Flor carpet tiles are fantastic (they're the industry leader), because when laid wall-to-wall they require no adhesive. None. So installation is super easy. And what a difference it makes to the basement! For one thing, the floors are much warmer (this carpet has a very nice pad underneath).

Next up, we finalized plans (in early August) for finishing the basement. We were going to leave it just a game room, but then decided we'd much rather do a massive home theater. For one thing, we love to watch tv and movies and so this was really the perfect solution to make this "room" get used all the time. Second, adding a giant sectional and adding a computer area makes it more of a "family room", which we definitely wanted. Third, it will really come in handy for family gatherings/holidays. In mid-August we purchased the lumber and building materials necessary for finishing the walls. We studded out all the walls and covered them in the same paneling that we used a few years ago. We decided not to drywall for two reasons: this is cheaper and much easier to install, and we like the richness and warmth it gives the basement. We're not huge fans of all types of paneling, but this stuff is so light and it just makes the rooms so cozy. That was definitely the vibe we were going for. Plus, no sanding and no painting! And if it ever gets wet it's much easier to remove and replace. And did I mention no sanding and painting? :)


The sump pump was in the main "family room" area, so we built a closet to conceal it. The closet has a bi-fold door and it's own light, plus plenty of room to store the ladder and space for Jas to get in there if he needs to work on plumbing, etc.


After finishing the walls we began acquiring the audio/video components and the seating. We also worked on plans for the computer area, which was to be added to the back of the main family room/home theater room. We decided on an eight foot desk (plenty of room to spread everything out!) to fit the section next to the sump pump closet. Jas was going to build me a custom computer desk (I'd already sketched it out and we'd discussed materials) when we decided to use an 8 ft. countertop instead. For less than $40, we found one at Menard's with a granite-look that I really liked and fit well with the space. Plus, when you set a drink down on it you don't have to worry about water spots! And it was so cheap!

The next order of business was to hang the suspended ceiling. Nothing complicated, really, but it is tedious and very time-consuming. We spent a week of evenings hanging the perimeter and the grid, and then a weekend putting in the tiles and adding new lights. This was where we lucked out with an amazing deal: we bought eight recessed can lights with cfl bulbs for less than $5 apiece at Lowe's! They were running a special, so we were worried that maybe that would mean the lights wouldn't be as good. But as soon as we got them all up and the old lights removed, we were sold. They give off the perfect amount of light, but yet they don't light the ceiling as much (they keep the focus on the walls and floor). They're very unobtrusive and they wash everything in this wonderful glow. Plus, they use hardly any electricity. Win win!


We knew early on that our main expense (other than the audio/video equipment) was going to be the seating. After toying with the idea of creating custom seating, we came across a beautiful (and humongous) microfiber sectional with a chaise at Slumberland. For $598! It was a special limited-time run, so we wasted no time in getting up there and checking it out. It fit all our requirements: amazingly comfortable, the perfect color, seating for a bunch of people, and a chaise. (I was adamant about the chaise, because I like to sit with my feet stretched out in front of me when I watch tv.) Plus, who could argue with that amazing price? Similar sectionals we'd looked at were at least three times that price. So we bought it.

The good deals continued on both the surround sound speakers and receiver. Best Buy ran the Yamaha receiver we wanted at a steal compared to what we'd seen online, and Jas found Klipsch surround sound speakers and a sub for a song on Woot. Jas knows the home theater equipment from his time at Stereo One, so I let him make the call on what we wanted to get. Because we plan to use this setup not just for regular television every night, but also to watch movies, we knew we wanted a top-notch receiver and speaker system. This was not a place to skimp just to save a few bucks. And you can't go wrong with Yamaha or Klipsch. They're both high-end. As luck would have it, though, we spent less than $500 for an amazing receiver and speakers and all the necessary wiring. As soon as he hooked them up and we tested everything out, it was as if the musicians were actually IN our basement. The audio quality is phenomenal!

Our original plan was simply to buy a bigger television, but then we decided to up our game. We could spend a few thousand on a 70+" flat-panel, or we could buy an HD projector and a really big screen. We opted for the latter, and settled on a 106" screen and an HD Epson theater projector. The screen is so massive, and as soon as we hung it up we were speechless. This makes all other tvs look so tiny! We wanted a high-end projector that displays excellent contrast (our Samsung tv upstairs has really spoiled us with excellent picture quality, so we knew we wanted something fantastic) and a sharp, clear, high definition picture. The Epson we bought was by far the most expensive part of this whole basement overhaul, but it was well worth it. Tons of good reviews, and the picture quality is amazing! I don't know if we'll ever get used to the screen size, but it's fabulous. Plus, we hooked up the xbox downstairs as well, so Forza 4 can be played on a movie screen. Awesome!


All in all, we love our new family room. This was definitely the best use for the space, and with the game room stuff moved to the old classroom, we have the best of both worlds. Plus, having such a big finished space is going to come in very handy at holidays and parties. (Update: we hosted both sides here for Christmas and the family room was perfect!) We use this space every day, because we watch all our television shows and movies down here. The Wii stayed upstairs (for now, anyway), but the xbox is down here. In addition, we built a large counter against the south wall at the bottom of the stairs for the kids to play Legos on, build with blocks, etc. There is an enormous amount of storage underneath the counter, plus bookshelves to hold all the Lego sets. The kids love having a space to spread their stuff out and create!


Jas built us a custom coffee table and end table for the space, and we found a small entertainment center at Target in a dark espresso finish that was perfect for containing all the a/v equipment. I printed up some of our favorite movie quotes in Photoshop and had them printed at Shutterfly, then added them to 11x17 canvases for the walls. My mom got us a "Theatre Room" sign for Christmas, which finishes everything off nicely.


This was A LOT of work, and a bunch of nights spent working from supper to bedtime. And a lot of weekends spent working with no breaks except mealtimes. But it paid off. As always, we love being able to do the work ourselves and not depend on others to do it for us. There's such a sense of satisfaction when you descend the stairs and look at what YOU'VE done. Plus, the sheer amount of money we saved doing it ourselves is a huge bonus. So it's definitely worth all the time and sore muscles!

6.19.2011

It is finished.

Well, thank goodness for that!  Last weekend Jas and I finished the last of our outdoor projects.  We built the flower boxes for the front entry.  Originally, we had planned to make tiered boxes that sat inside the corners of the front steps.  But that turned out to be a wee bit complicated, so I had picked out a large planter box style instead.  These would have cost us a fortune to purchase, but luckily Jas can build pretty much anything.  After I told him what I was envisioning he drew it out, we picked up the necessary material at Lowe’s, and we got to work.  I think they turned out fantastic! 

Day 163 

The boxes are about two feet x two feet, which is pretty massive.  Luckily I found some ornamental grass that reminded us of our Barefoot Cottage in Florida (these grasses were a big part of the landscaping down there) to give some height to the middle.  Then I went with petunias around the perimeter for a nice pop of color.  As soon as those petunias drape over the side in a few weeks they’re going to look absolutely perfect!  I added a couple of birdhouses to the front (the one on the right my cousin Laura made – isn’t it awesome?) and it turned out great.

Amazingly, this was an easy and inexpensive project, which was a nice way to wind down our spring of building projects.  So let’s recap the last few months, shall we?  We went from this bare backyard . . .

Day 74

to a 10’ x 16’ deck

Day 80

and a 10’ x 12’ storage shed with ramp for the lawnmower

Day 111

and the three-sided front entry

Day 127

and the landscaping

Day 153

and finished with the flower boxes.

Day 163

It has been a long few months filled with weekend after weekend of back-breaking work.  But you know what?  As usual it feels so awesome to know we’ve done it all ourselves.  We didn’t have to pay lots of money to have someone else create what we wanted.  And at the end of that day, that just feels wonderful.  We may be tired and sore, but there is an amazing sense of pride in our accomplishments.  And we wouldn’t have it any other way.

6.07.2011

What is wrong with us?

Depending on who happens to be reading this, you may come up with a variety of answers to that question.  :)  What I’m referring to, however, is our innate ability to begin massive outdoor projects when the weather is not conducive to them.  Like, for example, putting up our metal storage building in strong winds.  Or building our front entry in between rain showers.  Or this weekend’s landscaping project on the hottest weekend of the year.  What’s up with that?

It all started innocently enough last Thursday.  The kids and I were going to Lowe’s that morning to survey the plant situation.  I had made my plans and taken lots of measurements, and we were going to check things out.  It turns out that Lowe’s had some really good deals on the perennials I was looking for, so we wound up buying them.  I spent less than $120 on all the plants I needed.  How is that possible?

Day 153

All the perennials I was planning to purchase were sold in two or three different sizes.  I could have spent a lot more money by getting the larger, more established plants.  Instead I opted for the smaller varieties.  It saved me a TON of money and I’m willing to wait for them to grow.  Most of what I bought are fast growers, so it shouldn’t take forever.  I can be patient.  :)  A few of the plants are not in this photo above, because I’d already placed them on the north side of the house in the shade.

Jas went by Lowe’s Thursday afternoon and purchased the landscape edging we had already selected.  I didn’t want to mess with the stone blocks.  We’d gone that route at the old house and we decided against them for two reasons:  1) too expensive, and 2) a major pain to install.  You can’t just plunk them down on the ground and call it a day.  The job of making them level and fit nicely together is more than we really wanted to tackle.  I really want my plants (when they get nice and big) to be the stars of my landscape, so we opted for no-dig black edging.  The kind we chose is simply driven in the ground with stakes, and it was super easy (and super fast) to install.  And it was a lot cheaper than stone blocks!  We liked the look of it because it’s very unobtrusive, and once we mulched everything it gave it a nice, clean look.

Our tiller was not working, so we had to make a trip to Sappington’s Saturday morning (amid picking up the rabbit and purchasing groceries) to get parts.  Jas worked on it Saturday afternoon, and by Saturday evening we were tilling up all the areas for the future planting beds.  It was sickening outside, but we worked in the shade so it wasn’t completely unbearable. 

The next step was to lay out the edging material in the design that I wanted.  This stuff is really easy to bend and shape, so that didn’t take very long.  We had just enough (yay!), so after that we were ready to begin planting Sunday morning.

Sunday was exceedingly hot, and we had to take several breaks to avoid getting too overheated.  It didn’t work, with Jas throwing up (and then feeling much better) Sunday night and me barely able to move on Monday.  But we got everything planted, fertilized, watered, and mulched by about 7:30.  I didn’t have the energy to take any photos that evening, but I did take some this morning (Tuesday).  We still have a little work to do, which I’ll explain in a minute.

Day 157

The front yard has two variegated barberry bushes in the middle, flanked by two rose bushes.  On the end closes to the steps are two daylilies and two variegated liriopes.  As soon as those bushes grow a little this is going to look really nice.

IMGP0030

IMGP0026

The north side of the house (above) has four hostas of different varieties.  In case you’re wondering, the big open space in the middle is being saved for the peonies I’m getting from Susie this fall.  We didn’t get them in the spring, and now it’s way too late to do anything.  Oh well, I can wait a few months.  As you can tell in all these photos, I just watered right before I took these (hence the dark spots).

IMGP0027

The backyard has some Golden Eonymous, a couple of Cranberry Cotoneasters, some beautiful purple salvia, two Snowmound Spirea, and a Crape Myrtle.

IMGP0024

The grass under the deck has been sprayed with Roundup, and now we’re waiting a few days for it to completely die.  Once that happens, we’ll add more mulch to cover all that.  I’ll probably end up replacing these photos when that happens, but this gives you an idea of what it looks like.  Just imagine that grass being gone and mulch being in its place!  :)

IMGP0022

On either side of the steps to the deck we have six marigolds and a Moonbeam Coreopsis.  Over by the air conditioner is another cotoneaster and a spirea.  The spirea are supposed to get nice and big and fluffy white, so they should hide the air conditioner nicely.  Just like before, the grass you see under the deck will be dead and replaced by mulch this weekend.  We also need a little more mulch to finish out under the a/c unit, and then we’ll be totally finished.

Everything is small now, but it won’t stay that way forever.  And even though I normally have trouble being patient when it comes to home improvement projects, I’m actually looking forward to nurturing these little plants and watching them grow. 

Ultimately, we survived the atrocious weather this weekend by drinking plenty of water and Gatorade, and taking breaks when necessary.  We also worked only in the shady areas, which definitely helped as well.  At least it’s done, and that’s another project we can cross off the list.  All that’s left is to add the planter boxes for the front entry, which hopefully will get finished this weekend.  Then we can sit back and enjoy the fruits of our labor.  We’ve worked like dogs all spring, and it will be nice to sit back and relax for awhile.