6.19.2011

It is finished.

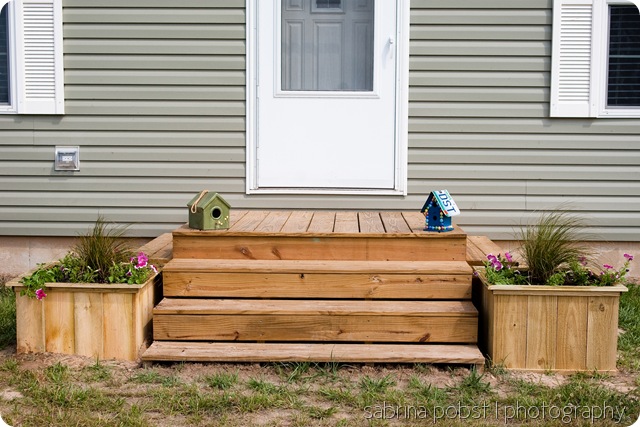
Well, thank goodness for that!  Last weekend Jas and I finished the last of our outdoor projects.  We built the flower boxes for the front entry.  Originally, we had planned to make tiered boxes that sat inside the corners of the front steps.  But that turned out to be a wee bit complicated, so I had picked out a large planter box style instead.  These would have cost us a fortune to purchase, but luckily Jas can build pretty much anything.  After I told him what I was envisioning he drew it out, we picked up the necessary material at Lowe’s, and we got to work.  I think they turned out fantastic! 

Day 163 

The boxes are about two feet x two feet, which is pretty massive.  Luckily I found some ornamental grass that reminded us of our Barefoot Cottage in Florida (these grasses were a big part of the landscaping down there) to give some height to the middle.  Then I went with petunias around the perimeter for a nice pop of color.  As soon as those petunias drape over the side in a few weeks they’re going to look absolutely perfect!  I added a couple of birdhouses to the front (the one on the right my cousin Laura made – isn’t it awesome?) and it turned out great.

Amazingly, this was an easy and inexpensive project, which was a nice way to wind down our spring of building projects.  So let’s recap the last few months, shall we?  We went from this bare backyard . . .

Day 74

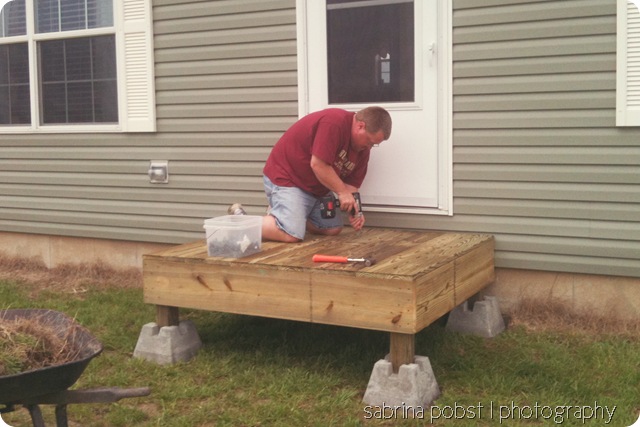
to a 10’ x 16’ deck

Day 80

and a 10’ x 12’ storage shed with ramp for the lawnmower

Day 111

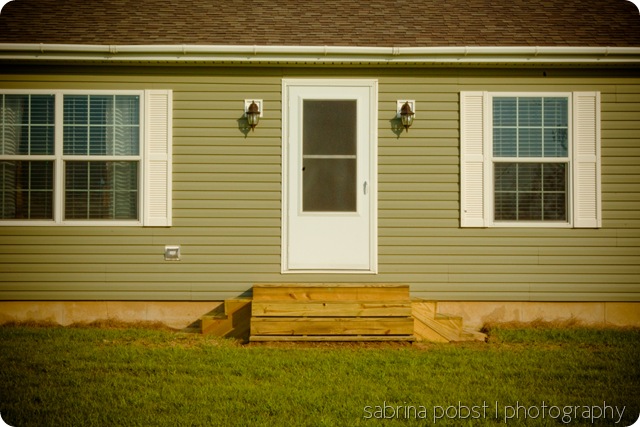
and the three-sided front entry

Day 127

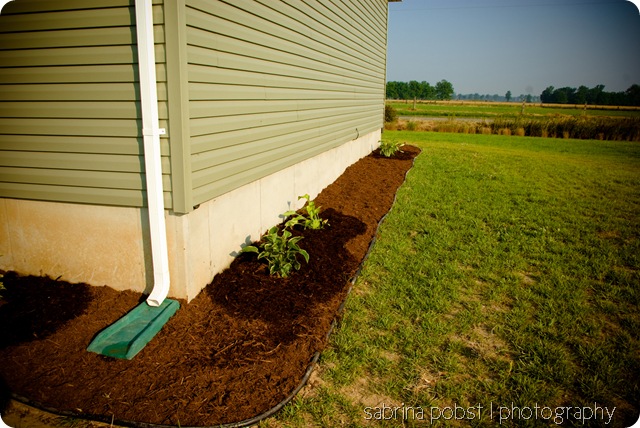
and the landscaping

Day 153

and finished with the flower boxes.

Day 163

It has been a long few months filled with weekend after weekend of back-breaking work.  But you know what?  As usual it feels so awesome to know we’ve done it all ourselves.  We didn’t have to pay lots of money to have someone else create what we wanted.  And at the end of that day, that just feels wonderful.  We may be tired and sore, but there is an amazing sense of pride in our accomplishments.  And we wouldn’t have it any other way.

6.07.2011

What is wrong with us?

Depending on who happens to be reading this, you may come up with a variety of answers to that question.  :)  What I’m referring to, however, is our innate ability to begin massive outdoor projects when the weather is not conducive to them.  Like, for example, putting up our metal storage building in strong winds.  Or building our front entry in between rain showers.  Or this weekend’s landscaping project on the hottest weekend of the year.  What’s up with that?

It all started innocently enough last Thursday.  The kids and I were going to Lowe’s that morning to survey the plant situation.  I had made my plans and taken lots of measurements, and we were going to check things out.  It turns out that Lowe’s had some really good deals on the perennials I was looking for, so we wound up buying them.  I spent less than $120 on all the plants I needed.  How is that possible?

Day 153

All the perennials I was planning to purchase were sold in two or three different sizes.  I could have spent a lot more money by getting the larger, more established plants.  Instead I opted for the smaller varieties.  It saved me a TON of money and I’m willing to wait for them to grow.  Most of what I bought are fast growers, so it shouldn’t take forever.  I can be patient.  :)  A few of the plants are not in this photo above, because I’d already placed them on the north side of the house in the shade.

Jas went by Lowe’s Thursday afternoon and purchased the landscape edging we had already selected.  I didn’t want to mess with the stone blocks.  We’d gone that route at the old house and we decided against them for two reasons:  1) too expensive, and 2) a major pain to install.  You can’t just plunk them down on the ground and call it a day.  The job of making them level and fit nicely together is more than we really wanted to tackle.  I really want my plants (when they get nice and big) to be the stars of my landscape, so we opted for no-dig black edging.  The kind we chose is simply driven in the ground with stakes, and it was super easy (and super fast) to install.  And it was a lot cheaper than stone blocks!  We liked the look of it because it’s very unobtrusive, and once we mulched everything it gave it a nice, clean look.

Our tiller was not working, so we had to make a trip to Sappington’s Saturday morning (amid picking up the rabbit and purchasing groceries) to get parts.  Jas worked on it Saturday afternoon, and by Saturday evening we were tilling up all the areas for the future planting beds.  It was sickening outside, but we worked in the shade so it wasn’t completely unbearable. 

The next step was to lay out the edging material in the design that I wanted.  This stuff is really easy to bend and shape, so that didn’t take very long.  We had just enough (yay!), so after that we were ready to begin planting Sunday morning.

Sunday was exceedingly hot, and we had to take several breaks to avoid getting too overheated.  It didn’t work, with Jas throwing up (and then feeling much better) Sunday night and me barely able to move on Monday.  But we got everything planted, fertilized, watered, and mulched by about 7:30.  I didn’t have the energy to take any photos that evening, but I did take some this morning (Tuesday).  We still have a little work to do, which I’ll explain in a minute.
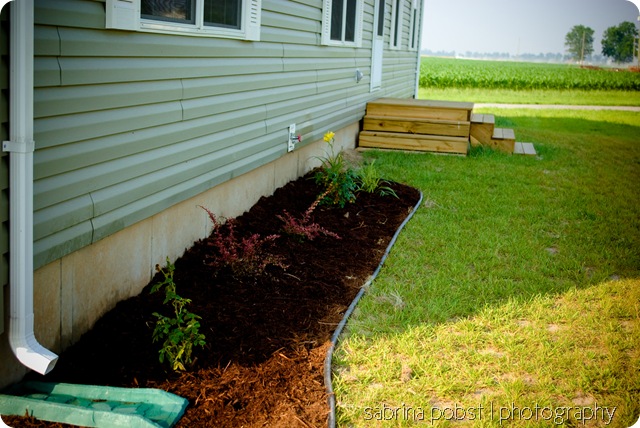
Day 157

The front yard has two variegated barberry bushes in the middle, flanked by two rose bushes.  On the end closes to the steps are two daylilies and two variegated liriopes.  As soon as those bushes grow a little this is going to look really nice.
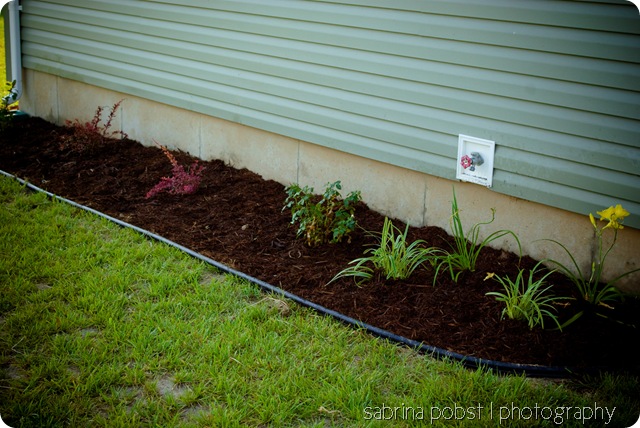
IMGP0030

IMGP0026

The north side of the house (above) has four hostas of different varieties.  In case you’re wondering, the big open space in the middle is being saved for the peonies I’m getting from Susie this fall.  We didn’t get them in the spring, and now it’s way too late to do anything.  Oh well, I can wait a few months.  As you can tell in all these photos, I just watered right before I took these (hence the dark spots).
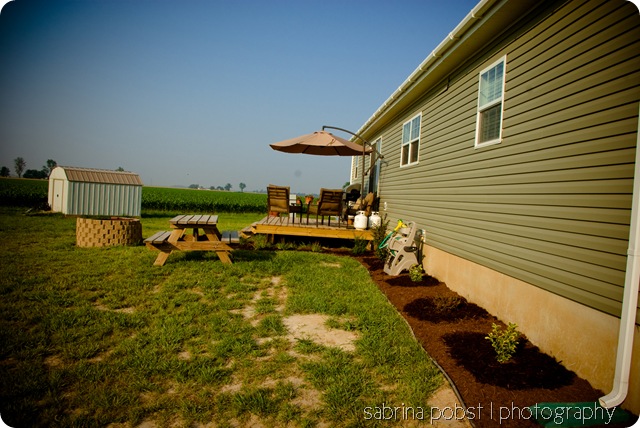
IMGP0027

The backyard has some Golden Eonymous, a couple of Cranberry Cotoneasters, some beautiful purple salvia, two Snowmound Spirea, and a Crape Myrtle.

IMGP0024

The grass under the deck has been sprayed with Roundup, and now we’re waiting a few days for it to completely die.  Once that happens, we’ll add more mulch to cover all that.  I’ll probably end up replacing these photos when that happens, but this gives you an idea of what it looks like.  Just imagine that grass being gone and mulch being in its place!  :)

IMGP0022

On either side of the steps to the deck we have six marigolds and a Moonbeam Coreopsis.  Over by the air conditioner is another cotoneaster and a spirea.  The spirea are supposed to get nice and big and fluffy white, so they should hide the air conditioner nicely.  Just like before, the grass you see under the deck will be dead and replaced by mulch this weekend.  We also need a little more mulch to finish out under the a/c unit, and then we’ll be totally finished.

Everything is small now, but it won’t stay that way forever.  And even though I normally have trouble being patient when it comes to home improvement projects, I’m actually looking forward to nurturing these little plants and watching them grow. 

Ultimately, we survived the atrocious weather this weekend by drinking plenty of water and Gatorade, and taking breaks when necessary.  We also worked only in the shady areas, which definitely helped as well.  At least it’s done, and that’s another project we can cross off the list.  All that’s left is to add the planter boxes for the front entry, which hopefully will get finished this weekend.  Then we can sit back and enjoy the fruits of our labor.  We’ve worked like dogs all spring, and it will be nice to sit back and relax for awhile.
5.07.2011

Landscaping Part One (The Front Entry)

Last Saturday afternoon we began work on the front entry to our house.  We have been all over the place for the last few months in terms of what we wanted out there, which is one reason why the deck and shed were completed first.  We came up with no fewer than four plans for the entry, but finally decided last week on a landing with wrap around stairs.  We worked during intermittent showers Saturday, but we did get the landing finished before the steady rain set in. 

Day 120

We built it in much the same way as the deck, but it’s obviously a little smaller. :)  The final dimensions ended up being about 4 foot by 5 foot.  It’s the perfect size to allow you room to swing the door open and move around a little bit.   Instead of concrete piers (like the deck has), we used deck blocks.  They’re  a concrete block with a design that allows for a 4x4 post to sit down in it.  This makes the entry easier to build, plus it is technically portable.  (Not that we ever plan on moving it!) :)

Because of the three days of rain following this build, we didn’t get to start the stairs until Wednesday evening.  Jas decided to cut all the stringers, stair treads, and risers Wednesday night, and then begin assembly Thursday evening.

IMGP9604

After supper Thursday evening we started the front set of stairs.   We placed concrete blocks in the ground and then attached the stringers, making sure that each stringer was level and the bottom of each one was resting on a concrete block.  Because of all the digging and leveling required to make these steps perfect, we only got one set of stairs finished.

IMGP9605

IMGP9607

Friday evening after supper we started on the south side stairs, and then Saturday we finished with the north side.  We were originally going to have the stairs wrap around, but we decided to make planter boxes for the corners instead.  Much more color, and it will be very pretty.  Those will have to wait, though, probably until we’re home from vacation.  Then we’ll make those and do the rest of the landscaping.  But the stairs are beautiful, and we’re so glad to finally have an entry to the front of the house. :)

Day 127

4.18.2011

The Shed Finally Gets Built, or “When will the wind quit sweeping down the plains?”

Saturday saw us inside re-caulking our shower while 35+mph winds blew outside.  Lyrics from “Oklahoma” float through my head, and I wonder when we’ve had a windier spring.  This is getting to be ridiculous! 

By Saturday evening after supper it was mostly calm, so we headed outside to get the floor frame and structural beams and supports put together.  We finished all that in a couple of hours, and were wrapping up by dark.  After checking the weather forecast and seeing that Sunday’s forecast called for another day of strong winds (when will this quit already?), we seriously considered putting some lights up and just working through the night to finish construction.  After all, the winds weren’t supposed to start up again until late morning.

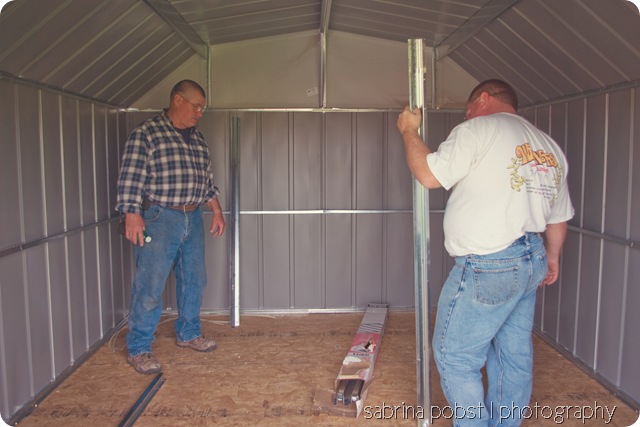
But we decided to call it quits for the night and just get up early Sunday morning and get to work.  We were up with the sun and quickly headed outside to begin construction.  I have zero photos of the construction process, because we were working at a fast and furious pace to get everything finished.  We had the walls up by 8 am, and were feeling pretty good.  But as soon as we started attaching roof panels the wind decided to rear its ugly head again and we were fighting it the rest of the day.  Fortunately, Jason’s dad came to help us when he got up Sunday morning, and with his assistance we were finished by 4:30.  Even with the wind.  (Jas said it probably added at least two hours to our construction time, because all three of us had to work on one piece at a time.)  Those big metal pieces were like sails as soon as you picked them up, so you can imagine how much fun that was.  :)

IMGP9532 copy

IMGP9534 copy 

We lucked out in the fact that almost every single one of our holes lined up perfectly.  We were also fortunate that Jason and his dad work so well together, and each could anticipate what the other was thinking, which made the process much smoother.  It was a long exhausting day, but it feels good to be able to cross yet another project off the list. 

Jason plans to anchor the shed even more with some lag bolts this week, as well as build a ramp to get the lawnmower in and out.  The floor kit we got for free from Sears (in the box in the above photo) is going to be used for extra bracing and to make some shelves.  Depending on the weather this coming week, we can hopefully get all that finished.

After that, landscaping is all that’s left!

4.10.2011

Shed – Part One

Day 100 

We’re building the floor for our new shed today.  In 50+ mph winds.  40+ sustained most of the day.  Not the best weather to be working in, but you work when you can.  The last two weekends have not been construction-friendly, so we’re working today.  Wind or no wind.  The floor was obviously all we could accomplish today, because there’s no way we could assemble a metal building without the pieces ended up five counties over.  :)

We built this floor frame similar to the deck a few weeks ago.  The construction is also similar to the platform bed frame Jas made for our bed before we moved.  It’s essentially a giant platform (or stage, as the kids like to refer to it!), leveled by concrete blocks.  I don’t have any step-by-step photos, mainly because of the wind.  There wasn’t really a chance for me to stop and take shots, so I’ll just describe the process.

Our first order of business was to cut all the perimeter pieces to length.  We used treated lumber for the perimeter, since that will be exposed.  We cut all four pieces and then assembled them in the rough location we had chosen for the shed.  After assembling them we added 2x4s to the inside of the front and back.  These sit a little lower than the exterior boards so that the plywood sheets end up sitting flush with the exterior boards around them.  We checked for square after that, and then leveled the whole thing.  I figured leveling it would take a really long time, but surprisingly it did not.  We cut all the joists to length next, and then attached them to the frame.  Jas added 2x4 braces down the center between the joists to prevent any sagging down the road.  Next up was the plywood sheathing for the floor.  We have two courses of plywood for an extra sturdy floor, and they sit nicely inside the treated frame.  We had to cover it with a tarp, however, because rain was coming. 

You should have seen us attempting to cover this floor frame in the outrageous winds.  The tarp was very difficult to control, but fortunately we covered it (with Connor’s help) and everything was safe from the impending weather.  As soon as the weekend rolls around (provided the weather holds), we will attach the shed to the floor.  Wish us luck! :)

4.03.2011

The Storage Shed Situation

As with everything else we do, plans for the storage building have revolved around tons of research, discussion, and drawings.  We have been back and forth on size, materials, location, and just about anything else that could be an option.  For the last few months, however, we had pretty much narrowed it down to what we wanted.

Our first decision was on size.  We knew we needed at least an 8x12 to house all that we planned to store in it.  For those who are interested, we plan to keep the lawnmower, weed eater, garden tools, bicycles, Connor’s large collection of outdoor Tonka toys, and the patio furniture cushions in the shed, as well as the flower pots and outdoor toys when not in use.  After measuring and discussing, we were confident we could fit all of that in an 8x12 building without overcrowding and making it impossible to find anything.  We discussed the possibility of going larger, but just like with our storage room downstairs we knew we’d fill any size shed up with extra junk if we had the room, and we don’t want lots of extra junk.  So just like the storage room, we planned for what we needed along with some extra room, but didn’t go crazy with the size.  :) 

Second was location.  We had pretty much decided to place the building next to the LP tank.  Of all the spots in our massive yard, that place made the most sense.  Which way it will face is still up for grabs.  Aesthetically, it would look nicest if the doors opened toward the yard.  But that would be facing north which we’d rather avoid.  We’d like the doors to open to the east for minimal rain issues, which will probably be the way it faces. 

The issue giving us the most fits has been materials to construct it out of, particularly the exterior.  Jas figured up several months ago that he could build the floor and interior framing for around $250, but the roof and exterior sheathing were not figured in that price.  The roof was not as big of a deal, but the sheathing options were not cheap.  Our 8x12 building was going to be at least $650, and that wasn’t including the roofing materials. We really didn’t want to spend that much if we could avoid it, so for the last couple of weeks we’ve been looking at metal storage barns and sheds.  We’ve looked at Lowe’s, Menard’s, Home Depot, Sears, and any other place we could think of.  Nobody’s had a good deal on anything in the size that we’re looking for (and with good reviews). 

That all changed yesterday (Saturday) morning, when Jas checked out Sears’ website and discovered that (this weekend only) they had a 10x12 metal storage building with a barn-style roof for $399.  It even came with a free floor kit.  After some discussion on floor frame options, Jas discovered that he could build the platform for the building to sit on for less than $100.  So we bought it online (they had one left in stock) and picked it up yesterday afternoon.  Yay! 

This means that for less than $500, we will have a bigger shed than we had planned (10x12 vs 8x12) with a taller roof for more interior height.  It also means that we’re getting it for $150 less than if we’d built it ourselves out of wood.  More than $150, actually, because that price of $650 hadn’t included the roof.  Double yay!

We checked reviews from plenty of people who’d purchased and set up this building, and almost every single one was a great review.  That’s always a good sign as well.  About the only real issue was from a man in the northeast who said he had snow load issues with the shed after several storms with 16+ feet of snow.  That’s not a pressing issue for us here in Southeast Missouri, so we threw that one out.  :)  He hadn’t bothered to purchase the extra snow load support kit, though, so . . .

Plans to build this building are up in the air right now.  Obviously with the atrocious winds today we’re not working on it.  They’re tentatively calling for rain this weekend so I’m not sure if we’ll be able to do it then or not.  I promise pictures, though, as soon as we get started.  :) 

3.30.2011

Connor’s New Room

Yesterday I got a bee in my bonnet about making some changes to Connor’s room.  His is the only room in the house that really has undergone zero changes since we moved in.  We set everything up in his room the day Jill and I brought the kids’ furniture over, and it really hasn’t changed.  I have not been happy with the lack of floor space in his room (and he hasn’t either), but I honestly didn’t think there was any way the bed could be moved to increase it any. 

That all changed yesterday after school, when I sent him in the living room with his Lego bucket and told him I needed his room for awhile.  Knowing how much the kids love surprises, I didn’t let either one of them in while I was working.  It took me less than an hour (and that includes vacuuming) and it cost zero dollars.  I think it turned out beautifully!  And check out all that available floor space . . .

IMGP9490 copy

IMGP9494 copy

IMGP9493 copy

Connor just loves it, and so does everyone else who has seen it.  What a difference a little furniture-moving makes!  Sometimes it’s the little changes that make a big difference.  In case you’ve forgotten what it looked like before, here’s a couple of shots (notice the narrow strip next to the bed that was his only place to play).

4977233582_75aa500b5f_b

4976623029_016d711817_b